System damaged by virus or usage errors are routinely experienced by computer users or laptop owners.
For owners and users of computer or laptop, have the ability to solve computer problems is very important because if not, maybe you will back and back again and spend money to fix it to the shop computer service to fix problems on your computer or laptop.
One of the problems on the computer or laptop is quite often the destruction of the operating system (eg Windows XP) is caused by a virus to cause your computer or laptop can not boot the operating system.
For that let us learn to fix and install the operating system on your laptop or computer.
And now we will learn how to install Windows XP.
You need to know There are several types of Windows XP,such as Windows XP Professional,Home Edition, Media Center Edition, Tablet PCEdition, Starter Edition, Professional x64 Edition,Professional Edition For 64-bit Itanium.
For those of you want to know and understand how to install the operating system computer,below I share guidance on how to install Windows XP on your computer or laptop.

Before performing the installation and you have to prepare first:

-Windows XP installer CD
-Prepare a CD DRIVER Computer or Laptop
-Make sure the Ram is also a minimum of 128 or higher
-Processor Intel Pentium III minimum or AMD equivalent or higher
-CD / DVD Room

Next follow the steps below :
 

-Insert the Windows XP installer CD into the CD Room

-Turn on or restart your computer

-when the post bios appear,go to Bios setting with press F2 or DEL button on keyboard.

-In Bios setting, select Boot on the menu settings and select the Boot Device Priority


-After that you change the [CDROM] in the position of 1st Boot Device to boot from the CDROM and then save your bios settings and Exit.


-Wait a while until it says "press any key to boot from CD"


-Quick Press Enter button or Any key button on keybord


-Now installation process will run and check perpheral and hardware and next will appear "Windows Setup"


 -Press ENTER button for install Windows XP

 -Next appear (End User Licese Aggrement),press F8 for Aggre


- Next installer will find your partition


Press C button for create New partition


-Then enter how much capacity you want to create partitions in units of megabytes (MB) and press ENTER button to create a partition


-Press ENTER button to select install


-on the choice of format the partition, choose to use NTFS, and then press ENTER to continue


- Making process and format the partition will start.all data on selected partitions will be deleted and the format.


-The next will take place the process of copying files Windows installer


-ensure process of copying files success and all file windows installer can copying.
 and windows automatic restart when copying finish


-after the restart, the computer or laptop will live again, to do the next intalasi.
and when it appears press any key you leave it and Dont press any key


-Furthermore it will go into Windows and Installation process will continue


- Set regional and languages


-On the next page, enter the CD key you get windows xp with you windows XP CD master .
You should not be wrong when entering cdkey.
Then press NEXT


-Then enter your name and the name of your organization and name computer

-Setting your Workgroup or Domain Computer.

-Setting your Networking

-Then wait for the complete installation and Finish.
  and Computer will automatic reboot

-Done and Finish

-Then when windows has been successfully installed and you install the driver Computer or Notebook you.


Read More

Sony Vaio VGN-NS140E notebook had operating system Genuine Windows Vista ® Home Premium.with Intel ® Core ™ 2 Duo Processor T5800 (2GHz, 2MB L2 Cache), 3Gb ram and 250GB Hard Drive.
If we up grade its operating system from windows vista to windows 7 it's certainly easy.
but how if we still want the windows xp as the operating system Sony VAIO VGN-NS140E notebook?
of course we have to down grade from windows Vista to windows XP.
to down-grade operating system windows vista home to windows xp on sony vaio VGN this is not easy.we it can not immediately install the windows installer cd xp.not could easily granted.
why? because I am sure you will get bluescren the installation process.
need special techniques to be able to install it.
one reason, it has a Sony Vaio VGN-NS140E format the hard drive with AHCI and by default Windows XP does not support the AHCI format.
for that there are 2 methods,ie using a usb floppy and built in the AHCI drivers into the cd installer.

How to down grade sony VGN notebook operating system into Windows XP?

follow the steps as follows:


The first method,

- You must have a USB Floppy

- Fill Floppy with AHCI driver.

   You can search for its drivers Sony Vaio site.

   search file INDSAT-15263700-XP.exe then extract.

   and enter the file iaAHCI.cat, iaAHCI.inf, iaStor.sys, iaStor.inf and TXTSETUP.OEM to Floppy

-then install windows xp using cd installer

-Insert usb-floppy already contains the AHCI drivers into the usb port the Sony Vaio VGN notebook

-When the initial installation process takes place, do not forget to press F6 to installer can take in the AHCI driver usb floppy.

-Continue the process of installing Windows XP to a successful and complete

-Finish


The second method,
With make Windows XP Cd installer that supports AHCI.

that is by way built in AHCI drivers into windows xp cd installer

how to make windows xp cd installer that already support AHCI for Vaio VGN this?

that we need to prepare is as follows:

-CD installer Windows XP

-Nlite
  you can download here http://www.nliteos.com/download.html

-Netframework 2.0 ( Nlite need this)
 you can download here

-File INDSAT-15263700-XP.exe which contains the AHCI driver (you can find at the Sony Vaio)

-File INDSAT-15468200-XP.zip (wich contains AHCI patch).

okay now, we'll make a cd installer.

follow the steps as follows:

 -Install Netframework 2.0

-Install Nlite.

-Insert Cd installer Windows XP to cdrom drive.

-Make a folder and extract file  INDSAT-15263700-XP.exe containing AHCI driver into the folder.

-Run the program Nlite


-In window locating the Windows Instalation,
 Click Browse, to direktori Cd installer Windows XP


- Next

-Next

-in Task Selection window,
Click Drivers and Bootable ISO button until the green


-Next

-in window Driver, choose single driver


-Then select  iaAHCI.inf 
 in window Storage Device Textmode Driver
Select option Textmode driver
 Then you sure choose only one,that is  Intel® ICH9M-E/M SATA AHCI Controller


 -Then Click Start Process


-Then continue the process of making an iso image, click Make ISO to start manufacturing.
will generate an ISO file that contains the Windows XP installer that already support AHCI


- Burn ISO File into CD blank

-Use that installer cd for to install Windows XP in Sony Vaio VGN-NS140E notebook
 You do not need a usb floppy anymore

-Perform installation of Windows XP as usual

-When installing Windows XP is complete, restart the Notebook.

- Then do not install anything first.
  You must install  Patch AHCI,That is File INDSAT-15468200-XP.zip,extract dan Install.

-When the patch installation is complete, restart your notebook

-Next, please install the other driver (you can look at the Sony Vaio website)

-Done and may be useful.


Read More

I will share my experience how to recover acer aspire one netbook that its windows broken system.

There are 3 method to recover it.

***The first method,
Use the Acer eRecovery tool

(if the system has not been damaged and the windows can still login is to capitalize on my Acer eRecovery tool that has been installed in the windows).

-Recommended Notebook is always connected to the mains via an adapter in order to ensure continuity of power supply notebook so no interruptions do anything at the time of recovery.This Must.

-Restart your windows and entered the bios and setting enable D2D recovery.
  save your bios settings.

-Login and entry windows and use the eRecovery tool to recover your system to normal as before.

-Awaited recovery process is complete.

***Method to two, Use D2D recovery
(If your windows system is damaged and can not login to windows at all the same).

-Recommended Notebook is always connected to the mains via an adapter in order to ensure continuity of power supply notebook so no interruptions do anything at the time of recovery.This Must.

-Turn on his netbook, then go into Bios and settings to enable D2D recovery.
  save your bios settings.

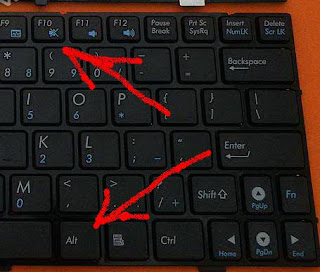
-Press the ALT + F10 when the emerging post bios.dont late and do it quickly and precisely.


-If true, then the system will enter recovery and eRecovery menu appears.

-Do eRecovery use the system recovery.

-Wait until the process is complete and successful recovery.


***Method to three, Use the Linux Live cd and live cd windows xp or Linux Live Usb
(use this method when you use 1 and 2 fail).


Needs to know,that netbook acer aspire one has a hidden partition that contains the image that is useful to recover the system when the system windows damaged.

-Recommended Notebook is always connected to the mains via an adapter in order to ensure continuity of power supply notebook so no interruptions do anything at the time of recovery.This Must.

-Make sure the first hidden partition that contains the system image is not damaged.

  Booting use windows xp live cd, and then see if the partition is hidden is called PQSERVICE (EISA) is not damaged.

  When the partition is damaged then it means the process of recovery can not be done.

  but if the hidden partition called PQSERVICE (EISA) is not broken then do the next step.

-Enter bios and setting D2D disable.
 save bios setting.

-Booting use linux live cd or Linux Live usb

-Use grub loader for booting the hidden partition.


  its usual location of the partition at hd 0.0

  in grub menu type-in  hd 0,0 / bootmgr     then enter.
  (This way for booting to the hidden partition )

-If true, then it will go into the hidden partition and the recovery menu will appear

-Then do the recovery process and wait until it is complete and successful

* If the hidden partition is not located in hd 0,0 then try looking at the hd hd 0,1 or hd 1,0

okay, good luck and hopefully I share useful.

******************************************************************

#advice to you who just bought a netbook acer aspire one netbook:

- Ensure or make a cd eRecovery when the system is still clean windows from viruses.

   This will facilitate the eRecovery cd you when your windows system is damaged and needs to be in recovery.

   You can use the eRecovery cd.

- Backup and Maintain a hidden partition that contains the system image is being damaged or exposed to the virus.
   This is Very Important, because in the image the system partition is located.
   when the partition is damaged then you will not be able to recover and repair your windows system as before.

Read More

Feel the pleasure of playing games with Alienware m15x-472CSB Gaming Laptop ,With stunning design the new Alienware m15x-472CSB gaming laptop is powered by a 1.73 GHz Intel Core i7-740QM quad-core processor with Turbo Boost Technology up to 2.93 GHz.
Additionally, it offers ultra-fast DDR3 system memory and ATI Radeon HD 5850 graphics with 1 GB of video memory. Taken together, this combination of high-performance technologies allow you to rip through the latest 3D games at lightning-fast frame-rates.
The Alienware Command Center brings you intuitive access to applications and controls, so you can easily adjust details like lighting effects and power. Other features include a 500 GB hard drive (7200 RPM), 4 GB of DDR3 RAM, double-layer DVD drive, Wireless-N Wi-Fi networking, Bluetooth connectivity, 2.0-megapixel webcam, and both a DisplayPort video output.

With 1.73 GHz Intel Core i7-740QM quad-core processor (with Turbo Boost Technology up to 2.93 GHz) delivers maximum processing power in response to peak demands. Intel's Turbo Boost technology maximizes speed for demanding applications, dynamically accelerating performance to match your workload--providing more performance when you need it the most.


with 1 GB of dedicated video memory ATI Radeon HD 5850 graphics Loaded with advanced technology and support for Microsoft DirectX 11, the HD 5850 has the power and premium features you need for fully immersive gameplay as well as the capability to expand your visual real estate across up to three displays. With ATI Eyefinity technology, you get the ultimate immersive gaming experience innovative "wrap around" multi-display capabilities.


Pre-installed with the Microsoft Windows 7 Home Premium operating system (64-bit version), you'll be able to easily create a home network and share all of your favorite photos, videos, and music. Windows 7 is the easiest, fastest, and most engaging version of Windows yet. Better ways to find and manage files, like Jump Lists and improved taskbar previews, help you speed through everyday tasks.

Product Features

·                     Intel Core i7-740QM 1.73GHz, 2.93GHz Turbo Mode, 6MB Cache
·                     6GB RAM (1333mhz); USB 2.0 Ports (3) RJ45 Ethernet IEEE 1394a (4-Pin) Port Audio-out   
           Connectors (2) Audio-in/Microphone Jack Built-in Front Speakers (2)
·                     500GB 7200RPM Hard Drive; Slot-loading Dual-Layer (DVD+/-RW)
·                     ATI Mobility Radeon HD 5850 (1GB); 15.6" High-Definition Widescreen (900p); 6 cell battery
·                     McAfee SecurityCenter with anti-virus, anti-spyware, firewall, 6 Months; Steam gaming portal

Processor, Memory, and Motherboard
  • Processor: 1.73 hertz Intel Core i7
  • Number of Processors: 1
  • RAM: 6 GB
  • Max RAM: 6 GB
  • Memory Slots: 4
Hard Drive
  • Size: 500 GB
  • Manufacturer: SATA
  • Speed: 7200 rpm
Graphics and Display
  • Graphics Card: Radeon HD 5850
  • Graphics RAM: 1024 MB
  • LCD Native Resolution: 1600 x 900
Ports and Connectivity
  • USB Ports: 4
  • USB 2.0 Ports: 4
  • FireWire Ports: 1
  • VGA Video Out Ports: 1
Cases and Expandability
  • Size (LWH): 9.63 inches, 19.88 inches, 17.38 inches

Read More

The G74 is a performance notebook that imposes its will with the combined power of a second generation Intel® Core™ i7-2630QM CPU and NVIDIA® GTX 560M GPU with 3GB of GDDR5 VRAM. A score of P2008 in 3DMark11 and P9180 in 3DMark Vantage takes over the reins as the fastest notebook in the land. Support for DirectX®11 ensures that you'll not only have the fastest rig in town, but also the ability to play games as they were meant to be seen for a long time.

Plus, its 17.3-inch LED-backlit Full HD display delivers the latest in high-definition entertainment with brilliant 1080p playback. The ROG G74SX-A1 breaks from the heard of traditional gaming notebooks with built-in overclocking features through the ASUS Power4Gear Hybrid utility—instantly giving you extreme power with a push of a button.

The ROG G74SX-A1 also boasts a massive 1.5TB 7200RPM hard drive, 12GB DDR3 system memory, Blu-ray Combo drive, high-speed wireless N, SuperSpeed USB 3.0 connectivity, Bluetooth v2.1, HDMI connectivity, 2.0 megapixel camera, and stereo speakers with EAX Advanced HD 5.0 sound.

Powered by the 2nd generation Intel Core i7-2630QM processor with 8-way processing capability, the ROG G74SX-A1 outperforms other notebooks with massive memory bandwidth for ultra-smooth multitasking performance. Featuring Intel Turbo Boost 2.0 Technology, processor speed is automatically adjusted to your needs by accelerating performance for your task at hand.

With a host of power profiles, this gaming powerhouse has a built-in overclocking mode via ASUS Power4Gear Hybrid that activates with a simple push of a button located above the keyboard that turns up system performance above its default level.

G74SX is great for gaming, but its hardware is serious business. It offers the best 3D ecosystem for PCs, offering 3D content creation and editing. It’s powered with NVIDIA® 3D Vision™, so games, photos and movies are all able to be enjoyed like never before. There’s also the ability to output the G74SX to a 3D TV, so you can enjoy 3D entertainment from the living room. Pair that up with THX + EAX 5.0 3D gaming audio technology, and together they make the G74 not only a great gaming notebook, but also a hub for multimedia entertainmen.
 

Specifications

Processor
Intel® Core™ i7 2630QM Processor
Operating System
Genuine Windows® 7 Home Premium 64bit
This version contains all product updates (SP1)
Chipset
Intel® HM65 Express Chipset
Memory
DDR3 1333 MHz SDRAM, 4 x SO-DIMM socket for expansion up to 16 G SDRAM (Quad Core), 2 x SO-DIMM socket for expansion up to 8 G SDRAM (Dual Core)
Display
17.3" 16:9 HD+ (1600x900)/Full HD (1920x1080)/Full HD 3D(1920x1080 120Hz) LED Backlight
Graphic
NVIDIA® GeForce® GTX 560M with 3GB GDDR5 VRAM
Storage
2.5" SATA
750GB 5400rpm/7200rpm
640GB 5400rpm
500GB 5400rpm/7200rpm
500GB 7200rpm SSH
Dual HDD Support*1
2.5" SATA
160GB SSD
Optical Drive
Blu-Ray DVD Combo
Super-Multi DVD
Blue-ray Writer
Card Reader
3 -in-1 card reader ( SDXC/ MS/ MMC)
Camera
HD Web Camera
Networking
Integrated 802.11 b/g/n
Built-in Bluetooth™ V3.0 (Optional)
10/100/1000 Base T
Interface
1 x Microphone-in jack
1 x Headphone-out jack
1 x USB 3.0 port(s)
3 x USB 2.0 port(s)
1 x RJ45 LAN Jack for LAN insert
1 x HDMI
Audio
Built-in Speakers And Microphone
EAX Advanced HD 5.0
THX TruStudio
Battery
5200 mAh 74 Whrs
Power Adapter
Output :
19 V DC, 6.3 A, 150 W ((Quad Core)) , 120 W ((Dual Core))
Input :
100 -240 V AC, 50/60 Hz universal
Dimensions
32.5 x 42 x 2.09 ~6.2 cm (WxDxH)
Weight
4.28 lbs (with 8 cell battery)
Security
Kensington lock
Note
*1 : dual HDD support up to 1.5TB / Solid State Hybrid drive up to 1TB

Read More